Showing posts with label Jewelry design. Show all posts

Monday, May 20, 2013

May Earring Swap Blog Hop Reveal

Today was supposed to be the reveal for a May Earring Swap Blog Hop hosted by Jessica Murray of Whimsical Monkey Artisan Jewelry. However, on Friday a few bad apples harassed her about the few rules that there were (3 people, really?) and she canceled the reveal with a very bad taste in her mouth. Many of us decided to go ahead and post about the earrings we sent and received, and I decided to do so as well.

My partner was Marde Lowe of FanciMar Designs. We exchanged emails and I checked out her web page and Facebook page, but she said she wasn't sure she had a personal style, so I sort of went on my own for designs. On to my favorite place for inspiration, Pinterest!

I found a wire wrapped earring I really liked on a Hungarian website (pinned here) - a lot of the blog posts had photo tutorials on them, but this post just had a link that no longer went anywhere (sigh). But by checking the comments, I found out the design was based on a PIPA Chinese knot. With that, I ran a Google search and found an illustrated knot site for the PIPA Chinese knot that I could follow here. After about 2 practice rounds with 16 gauge Copper, I actually made earrings that were the same size and didn't have a ton of tool marks on them! I topped them with a multicolor lampwork bead and a light blue Swarovski bicone. I put them on long kidney wire hooks to finish them.


Because most blog hoppers send extras, I made a second pair too, with Czech beads. They are in Copper too, but a more simple style (my fingers couldn't handle any more wire work, LOL). I made a swirl on the front of the diamond striped beads but that's as fancy as I got. Still, I think they're pretty nice!


Marde sent me 2 beautiful blue pairs of earrings! I really like the dangle earrings. Better watch out for me when I wear those Evil Eye ones, too.


I am still including the list of original participants. Like I said, many of them planned to still post, but not all. Hopefully you will see a few earrings if you pop around!

Blogs:
Inge von Roos: ingetraud.wordpress.com
Nancy Smith: wirednan.blogspot.ca
Miranda Ackerley: http://blog.mirandack.com/
Shelley Graham Turner: www.shelleygrahamturner.blogspot.com
Ginger Davis Allman: http://thebluebottletree.com/
Mary Anne Flesch: www.handcraftedserenity.blogspot.com  **You are here
Nicole Valentine Rimmer: www.nvalentine.blogspot.com
Stephanie Weiss: uniquelymebwd.blogspot.com/
Spun Sugar Beadworks: Spunsugarbeadworks.blogspot.com
Tania Spivey: http://moobiegrace.blogspot.com/

Facebook Pages:
 
Beccy Peterson: Beccy's Baubles
Ani Forsyth: Veil Dancer
Marde Lowe: FanciMar Designs

Sunday, April 14, 2013

Resin-ating

I recently met a local beader via Facebook (Judy Y.) and we have met and talked a few times. I love making resin pieces, and she had never tried it out, so she asked me to teach her how. We met last Saturday at her house for our session.

I am amazed at how many jewelry/beady people I talk to on Facebook that are afraid of resin! It is one of the easier things I have tried.

Here are the supplies you need: Two part epoxy resin (brands include Ice Resin, Easy Cast), Mod Podge or Elmer's Glue, bezel, photo sized to the bezel frame or scrapbook paper, measuring cup, stir stick, scissors, paint brush, protection for your work surface (in this case the rest of the piece of paper from which we cut the photo). Optional supplies: oval punch, fixative spray (if you are using an image from an Inkjet printer).

Some of the supplies we used for Resin Day
This particular bezel doesn't have a great finish on it and I've had issues with the resin causing the brass to turn green, so I coated it with clear fingernail polish before I got to Judy's house.

Judy scanned and resized this photograph of her mother before I arrived. She has an Inkjet printer, so I brought along my Krylon Workable Fixatif spray sealant. It prevents the ink from smudging, takes only a quick spray or two, and dries in about 10-15 minutes.

You always want to coat any image or paper that you want to put under resin. Otherwise, the resin will bleed through in spots, darkening the paper only in certain areas. It's not a nice look (ask me how I know)! I use Mod Podge to coat my images, usually 2 coats. Judy coated the images and we let it dry about 10 minutes between coats.
Judy coats the image with Mod Podge; the original photo is in the upper left corner
Judy had purchased Ice Resin in a plunger-style container, so that is what we worked with. The most important thing is to FOLLOW THE DIRECTIONS ON THE PACKAGE EXACTLY, regardless of what brand you purchase! Different brands have very different directions, so be sure to read and re-read so you following them to the letter. That will be the biggest key to success with resin.  If you purchase a two part resin, get a measuring cup to ensure that you get equal parts. I have mis-mixed, and the results are not pretty. It's better to dump the whole thing than bother pouring it and waste bezels, artwork, your time, etc.

The Ice Resin instructions say to push the plunger into a container, mix for 2 minutes, then let them sit for 5 minutes to let the bubbles settle. I strongly recommend that you use a timer to make sure. It's amazing how long 2 minutes seems when all you're doing is stirring...

Push, stir...
...and wait.

While we were waiting, we glued the now-dried and coated photo into the bezel. Again, you can use Mod Podge to do this. You only need a very little bit, you shouldn't see any white areas - if so, you have too much Mod Podge on the bezel.  Burnish or push down the edges of the image into the corners of the bezel.  We used the opposite end of our stir stick. BE CAREFUL, the image is wet and will want to tear.

After the resin sat for 5 minutes, it was time to pour. Judy asked me where to pour - usually you pour right into the middle, seeing how the resin flows, and adjust where you are pouring. If you can see in the photo below, it was pooling toward the top, so she adjusted toward the bottom of the bezel. POUR SLOWLY. You don't want to get to this point and overpour!!

Pouring resin..go slowly!


Bubbles are inevitable. You can get rid of them in several ways - a pin or headpin, a lighter, blowing through a straw, blowing directly on the bezel.  I usually use a pin, or blow directly on the bezel. You blow with an open mouth, like you are warming up your hands on a cold day - NOT like you are cooling down your soup! It is the carbon dioxide we exhale that pops the bubbles.  You always carry your warm breath with you, but you may or may not have a pin, lighter, or straw handy.  You really have about 4-5 hours to pop bubbles.  After about an hour or so, you must use a pin to pop the bubbles; the resin has gotten too thick to blow them away.

Resin is self-doming; it has enough surface tension to dome on its own. Here is a side view of the bezel after Judy poured all the resin in. We made just enough!

Side view of newly poured resin
That's it...all that's left to do at this point is wait. The resin will cure hard to the touch in 24 hours, and will totally cure in 72 hours. Resin definitely works better in warmer weather, so now through the end of summer is perfect resin-pouring time!
 
Judy finished her necklace this morning, and here is the finished product. Do you see any bubbles? I don't - looks like Judy blew the all away.

Red was her mother's favorite color, so she made sure to use red beads in the necklace. She has an heirloom she can wear around her neck, to remember her mother at all times!
 
I hope you that this tutorial will encourage you to give resin jewelry a try!
 

Judy's finished necklace - an heirloom she created herself!

Tuesday, March 19, 2013

Brass Bezel Bleedthrough

My 9th grade teacher would be so proud of my alliterative title! I can't remember her name, but I can see her in my head - a short, round woman with dark hair who couldn't believe how ignorant we were about grammar. Anyway...

I had some brass bezels on hand, and I purchased some Mod Podge Dimensional Magic at the new Joann Fabrics store that recently opened in Columbia, MO. I wanted something for quick narrow bezel fills and I had read about this product - I used a 50% off coupon so I could give it a try.

This was about 2 weeks ago, so I decided on a St. Patrick's day theme.  I cut an oval out of shamrock paper glued it down and filled it up with Dimensional Magic, waited overnight.  The next morning, it was a MESS. The ink bled through! Ugh! I didn't take a photo of that because the idea to blog about didn't come to me until after I took it apart.

When I stripped everything apart, it wasn't the ink on the paper that had bled, it was the brass on the bezel that had turned green. The pink arrows point out the greenest part but it still may be hard to see. But it was obvious in person.
Ugh! Green!
I scrubbed and sanded it clean, then coated the bezel with clear fingernail polish. Not sure if you can see the coat of clear polish either, but here is what the cleaned-up bezel looks like.
After a coat of clear nail polish
The nail polish was just what I needed. The next pour worked perfectly! I topped the shamrock paper with a 3D glitter shamrock sticker, and coated it again with Dimensional Magic. I made 2 this time, and the results turned out just like I wanted! 
Finished bezel pendants

This product won't totally replace using two-part epoxy resin, for one thing it is not self-leveling. But for quick little pendants like this, it works well. I hope this little coating tip helps you when you are working with raw metal bezels.

Tuesday, February 19, 2013

Finally Done, and not Overdone

My last blog post described my "One step too many" heart, and how I went overboard by adding one more thing. The second time, I stopped before I overdid it.


I finally finished the heart and the necklace design yesterday - too late for Valentine's Day, but that's OK.

Brass Heart Pendant
I purchased the plain brass heart pendant, and then embossed it with my Sizzix BigKick machine. I used a Cuttlebug folder for a more geometric look (the Vintaj decoemboss and decoetch folders are great, but I wanted something different). Then I added alcohol ink and Vintaj patinas, extra-fine black glitter, sealed it with Vintaj Patina Glaze, and embellished with Swarovski flatback crystals in a lavendar color.

Originally I wanted to make it into a true lariat necklace, but it didn't hang like I wanted, so I put a Brass toggle clasp in the front instead. I debated on putting the dangles in front of the heart or the back, but in the end I chose the back because it was distracting from the heart too much. The rest of the chain has one AB finish lavendar faceted crystal on one side, and three purple dyed jasper rondelle beads on the other.
Pendant, clasp and chain
I decided to make matching earrings match the dangles that hang behind the heart. <rant> Man, making loops on 2-4mm faceted beads is a KILLER on my thumbs! I have got to find a new method because I am pushing directly on the facets when I bend my wires and it just hurts. </rant>  The large bead at the top of the earrings is the dyed jasper on the left side (facing) of the chain, and the dangles are the same beads as the ones that dangle from the hearts. They are not only a great match, but they are lightweight and will work great worn with or without the necklace.

Matching Dangle Earrings
You can see both items in my Etsy shop: Necklace and Earrings. Thanks for stopping by!

Sunday, February 10, 2013

Just one more...

Have you ever had a piece nearly perfect when you decided to try one more thing?
Yes, here I am with my trusty (used) toothbrush and nail polish remover scrubbing everything OFF the embossed heart that was almost finished because I wanted to add something else.

And guess what? It was too much. But at least now I know where to stop.

Stay tuned for Round 2...

Saturday, February 2, 2013

Wellness Words Jewelry Challenge

Today's post is about Tracy Statler's Wellness Words Jewelry Challenge from her blog Make Bracelets! I love all of Tracy's blog posts and it's one of the few that I follow - I usually learn something from each one of them and I look forward to getting and email that there is a new one to read.

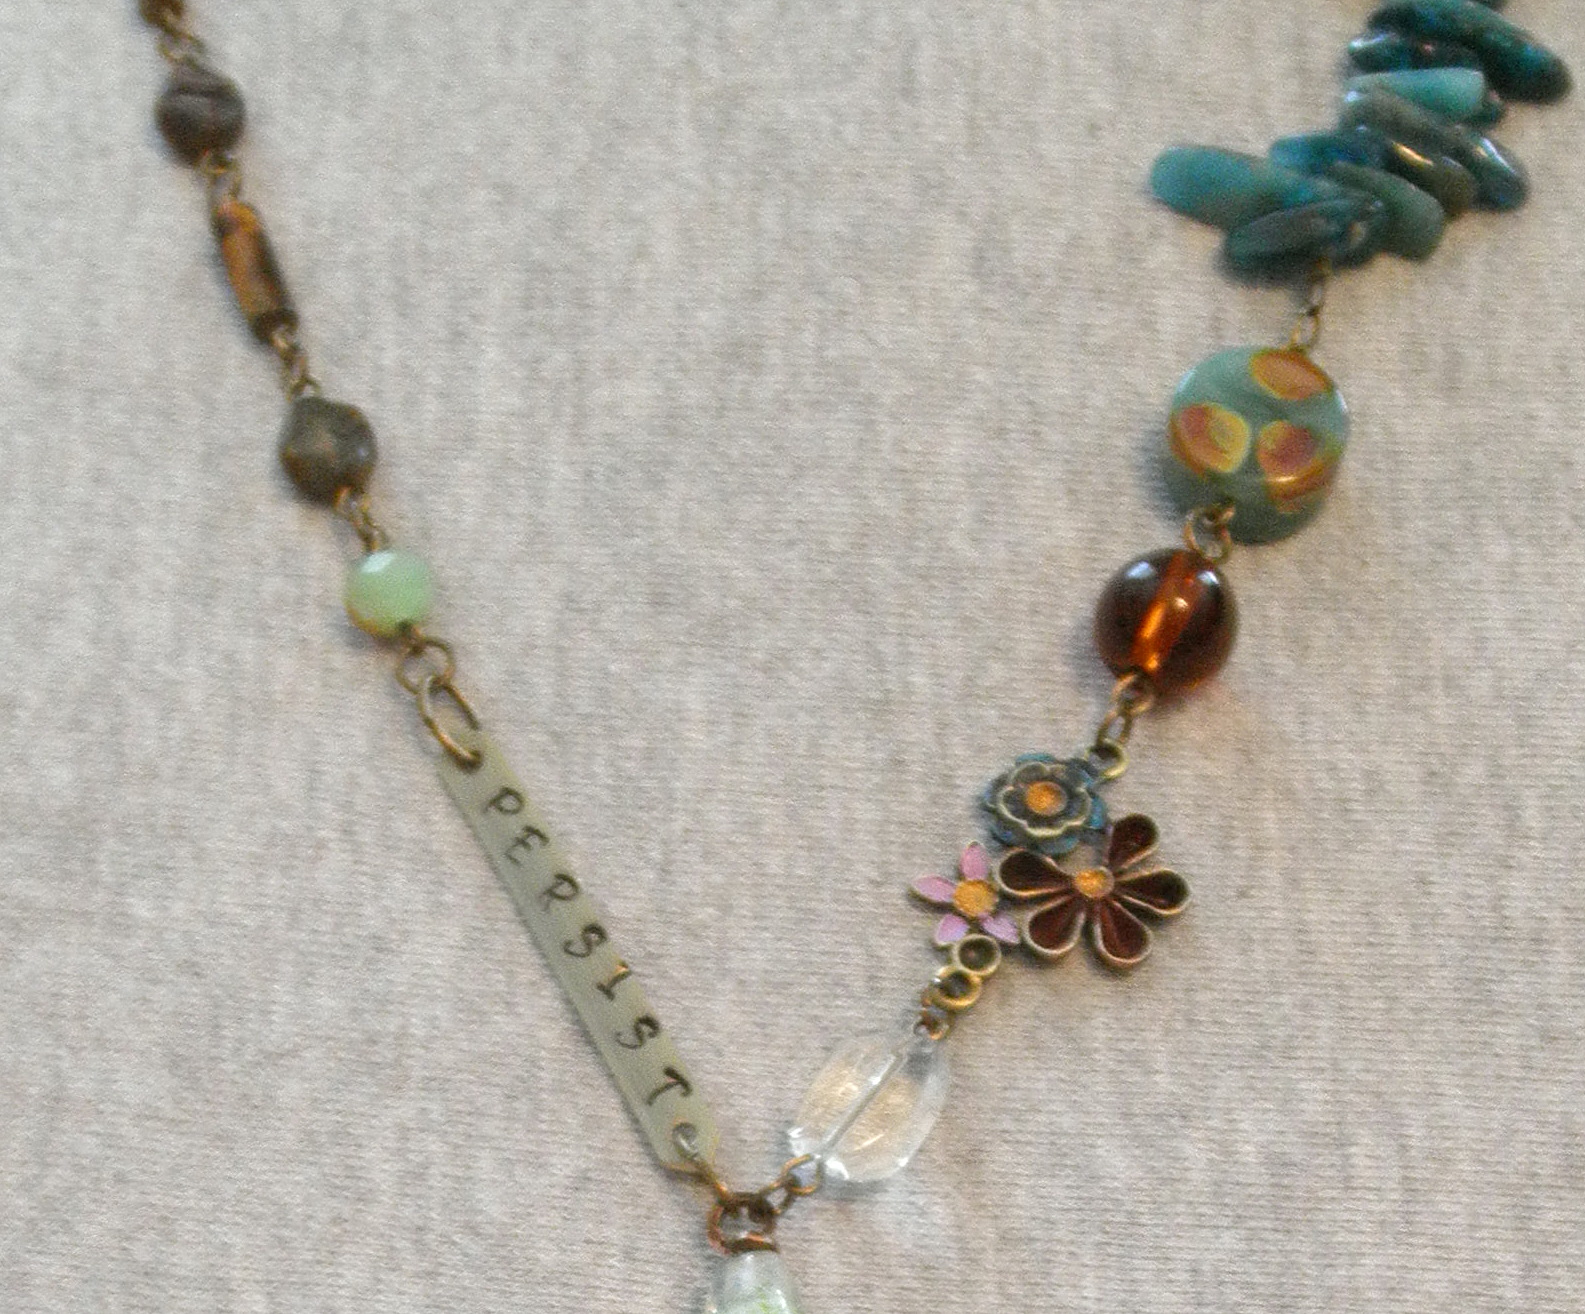
Tracy's challenge was to come up with an inspirational word or phrase in an area of your life where you want to make positive change. My word: Persist.  I have been working on finishing things that I start!

I knew I wanted to stamp my word on a strip of brass, which I had on hand. Another word I could have used - "Practice," because good, clear, even stamping isn't one of my strengths. You can probably tell by the position of the I.

Friday night was a prime example of persistence. I waited until the last minute finish this necklace (maybe my phrase should have been "Stop Procrastinating") and I thought about just saying to heck with the deadline. I mean, I had the phrase piece done. But I stuck with it for once!

However, it was too late to get a good photo. There is always a hitch, isn't there? So you are getting the best photo I could take tonight. I promise to get a better photo of the whole necklace, because it looks pretty good and there's lots more goodies to see than just this section.

EDITED: I'm back with more photos of the rest of the necklace. Originally, I was going to have the "Persist" Brass segment hang from the art bead and then the dangles hang from that, but it turned out way too long and in the end, I like it as part of the necklace anyway. The brass flowers were a plain connector that I colored with Vintaj Patinas and Tim Holtz Adirondack Alcohol Inks.The remainder of the necklace is finished with a combination of Picasso finish beads and Tiger Eye tube beads on the left, and Brown Glass bead, a polka-dot Lampwork Art bead, and Blue Peruvian Opal stick beads on the right.  The back end of the necklace ends with a brass chain and a toggle (OK fine! It *will* end with a chain and toggle, I promise!)

Complete necklace (left); Pendant and Dangle detail (right)

Please visit everyone else who participated in this challenge.
acreativeforce.blogspot.com
alankarshilpa.blogspot.com
allprettythings.ca
anniamaebisuteria.blogspot.com.es/
apolymerpenchant.com
beadlolabead.blogspot.com/
beadrecipes.wordpress.com
centsations.wordpress.com
clay-space.com/
creativeatelier.net
elliesbijoux.com
emakdesigns.com
erinsiegel.com
etsy.com/shop/shamaen
facebook.com/hotsouthernmessdesigns
facebook.com/soquilidesigns
fairiesmarket.blogspot.com
firstimpressiondesign.blogspot.com
gemsbyjudy.com
glasstastreasures.blogspot.com
handcraftedserenity.blogspot.com
humblebeads.blogspot.com
facebook.com/azuresunshines
facebook.com/whdalaska
jeanetteblix.com
kimmykats.com
kymhunterdesigns.blogspot.com
lisayangjewelry.com
macmillanmarie.blogspot.com
makebraceletsblog.com
miabellasoul.com
misheldesigns.com
mycreativechallenge.blogspot.com
noseycritters.blogspot.com
pixiloo.blogspot.com
sandivolpe.com
sharonsjewelrygarden.blogspot.com
shaterra.etsy.com
shinylittlethings.blogspot.com
shymedesign.se
shymessmycken.blogspot.se
simpleearthcreations.com
soultosubstance.com
suebeads.com
sunshinebliss.com
sweetbeadstudio.com
sweetwillowdesigns.blogspot.com
thebeadingyogini.com
thestudiosublime.com
treasures-found.blogspot.com
twitter.com/ldymlivelystone
vault31.blogspot.com
veradesigns.blogspot.com

Wednesday, January 9, 2013

Dried Flower & Resin Pendant

I have a pinched nerve in my neck right now. Besides the obvious "pain in the neck" jokes, it is keeping me from creating anything new. Talk about a hardship for the creative soul! So I am blogging about a piece of jewelry that I created in the Fall.

I have mentioned before that we are lucky to have a neighborhood park within walking distance to our house. Before Winter set in, I would walk Mo (our 2-year-old Bassett-Cockapoo mix) around the trail. Yes, I am a fair weather walker. What can I say?
Mo, my walking partner
In one corner of the park were an abundance of dried flowers in a beautiful deep red color. They were perfect for a resin pendant! I collected several at the end of one of our walks and headed back home. I wanted to make the pendant right away so that the color didn't have time to fade.

I used a flexible resin mold that I got from Hobby Lobby with one of their 40% off coupons. I like it because there is a large assortment and the resin releases easily from the mold.
Hobby Lobby assorted shapes mold; oval shape I used is in lower left corner
I mixed up the Easy Cast resin according to the package directions. I poured a small amount of resin into the mold first (I did this is to prevent the dried flowers from projecting out the front of the pendant). Then I placed a few small pieces of the dried flower in the mold (about 3), and filled the mold the rest of the way. If you are trying this yourself, DO NOT overfill the mold! You don't want it to mound up as if you were filling a bezel; you want it as flat as possible. I used tweezers to move the flowers around to their original position - they almost always move; after all, you poured liquid on top of them! Toothpicks or even headpins If using tweezers or a headpin, wipe immediately.

Then you WAIT. A full 24 hours. No really. There's no rushing resin. Pop it out, and glue a bail on the back.

The result is pictured below. I hope you'll stop by my Etsy shop to see the listing for this necklace.
The finished pendant


Tuesday, January 1, 2013

Trying something new - Making Woolywire beads

I think I have mentioned before about the greatest jewelry group on Facebook called Creative Bead Chat (CBC). We share tons of creative ideas, tips and tricks. It's a great place for jewelry designers to be.

One day, CBC member Sandra McGriff posted a giveaway - she had been gifted beads and Woolywire from another CBC member and hadn't gotten around to using it, so she decided to give it away to someone in the group. And guess what, I won!

Woolywire is a product available from yet another CBC member Karen Totten (Etsy shop Starry Road Studio). According to the product description on Etsy, Woolywire is "fiber that has been hand dyed and hand spun onto 24ga solid copper wire can be shaped, twisted, coiled, wrapped, woven through chain, for your jewelry creations. It has been permanently felted to keep fiber fixed to the wire."

I received 3 feet of Woolywire in a mix of blacks and pinks plus 3 ceramic beads - two wavy tube pink beads and one black leaf bead. The curl of the wire in the package made me instantly think of making a Memory Wire bracelet.

I like to make chunky bracelets with Memory Wire, so I went to the stash and started pulling out all the pinks medium sized and a little larger. I did purchase one strand of purple, pink and pale yellow crinkle glass nuggets to tie it together, but the rest came from my stash (hooray). I ended up with 4 rounds of beads.

My original thought was to weave the Woolywire through the entire bracelet - a twist here, loop around a few beads, twist again, etc. etc. But I had made the bracelet too long for that plan! Plan B: cut the wire in fourths and make Woolywire beads.
Woolywire bead!
The Woolywire comes with detailed instructions on how to cut finish the ends, right on the packaging materials. I followed them to materials. I followed them to a T and it worked perfectly.

Instructions included

So here is the finished bracelet. I am very happy with how the beads and the bracelet turned out. I still want to try out the original plan of weaving the Woolywire throughout a bracelet, so I see another purchase in my future....


I am including a link so you can check out the bracelet in my Etsy shop.

Saturday, December 29, 2012

The Brave Necklace

I promised myself that I would start filling my Etsy shop with all the designs I already have made but haven't listed because of all the holiday shows (and the fact that I *hate* listings - but that's another story).  So this week, I kept that promise to myself and listed 3 items over 3 days - not bad!

One of them was this inspirational necklace with a decorative "Brave" charm hanging from the end.
"Brave" necklace
I had this decorative charm in my stash for a long time before this design came to me. I wanted something special for it! For a certain time in the near past, bravery was a pretty important part of my day. Let's just say that teenage children can be beyond stressful!

One day, I pulled out the charm and the keyhole connector and started designing. Out came this little necklace. I love the Brave charm and keyhole together, the little pearl, the little wing, the shades of brown, grays and blues in the beads - heck, I love everything about this design.

Late in the evening, I get a notification on my phone, and it's an Etsy notification - I've sold the Brave necklace! It was my first sale after getting my iPhone, it's a "cha-ching" sound, LOL! Took me a while to figure that out.

As it turns out, a FB friend from one of my groups purchased it, and had the nicest things to say, "You never know when your jewelry will be an answer to a prayer! You have no idea how this will brighten up someone's day."

Gosh. I never thought about how my jewelry might affect people in that way. I only thought about how it made me feel. It's really validating for someone *else* to feel that way.

What a great end to my week!

Friday, December 7, 2012

Holly Berry Eyepin - a Quick Tutorial

I thought I would share with you how to make a Holly Berry headpin to top a pair of earrings. Sorry for the quality of some of the photos, it is really hard to photograph your own tutorial, especially with your left hand! I used the headpin to make a quick pair of Holly leaf and berry earrings.
For each headpin, you need 3 4mm red pearls and one 2" headpin. I used silvertone, but copper or brass would work just as well.

String the 3 pearls on the headpin so that the leftmost pearl ends at about the halfway point on the headpin.

Bend the right side of the headpin over to the left, as shown in the photo. You will need a slight bit of space between the pearls to bend the headpin all the way up.
Bend the left side of the headpin over to the right, making sure to go BEHIND the previously bent end. The right side will end up at the bottom, so you want it on the back side of the cluster.
Continue to bend both sides until the head side of the pin is flat and the right side is bent straight down. A triangle will form with the pearl berries. The right photo shows the headpin from the back - and of course that's the photo that is actually in focus!

Front side
Reverse side
Cut off the top of the headpin. Trim and make a loop at the top. Straighten out the loop and the back wire if necessary.

That's it, you're finished! Your Holly Berry headpin is ready to use however you'd like. I hope you enjoyed this tutorial - please let me know if you find it useful!
Finished headpin
 

Thursday, November 29, 2012

NO Berries and Leaves - a personal challenge

Earlier this week I blogged about the Winterberry Pendant I made as an entry in the Artisan Whimsy Berries and Leaves November Challenge.  Today, I want to share with you my "No Berries and Leaves" pendant, which I also made from a photograph that I took at the same time as the photo used in the Winterberry pendant.

If you remember, I ended up with 6 usable photographs from the photo session in our neighborhood park. Columbia, Missouri has approximately 30 small, neighborhood parks and our neighborhood is lucky enough to have one. The park includes a children's play structure, a concrete basketball court, a small shelter with picnic tables and grill, and a 1/3 mile gravel track. It also has two giant oak trees

Photos from Louisville Park, Columbia, MO

After finishing the Winterberry Pendant, I wanted to use the tree photo next. This idea about a black-and-white photo pendant using a bare tree has been stewing around in my brain for a long time and the time of year was finally right to capture the tree and its limbs.

Using Picasa (my favorite graphics editing program), I added a black-and-white filter, a vignette border and cropped away the sidewalk in the forefront of the photo. I found a rectangular wooden blank in my stash and painted it black with silver accents, then resized the photo and sealed it with Matte finish Mod Podge. Voila! The result was exactly what I had in mind. I added a Tim Holtz eye hooks - just the perfect size for the wooden blank.

Tree Pendant

Now all I have to do is turn the pendant into a necklace. Hopefully I will have time to do that soon, but I have Christmas shows for the next 2 weekends. I am feeling some stress and trying to get everything that I have started finished, but I guess that means I should stop starting things!

Tuesday, November 27, 2012

Berries & Leaves - Artisan Whimsy's November Challenge

Artisan Whimsy is a great website for creative folks to connect. It was created by 3 ladies from our Facebook group Creative Bead Chat. If you aren't a member yet, you should head over to both and join us!  Every month, they host a challenge. This month, it's Berries and Leaves. Perfect for the Holidays!


I have been on a nature kick with Fall in full swing. Mo, my 2 year old Bassett/Cockapoo mix, and I walk around our neighborhood park every day! I pick up acorns, dandelions, bark just to mention a few - and I take photos. Tons of photos (thank goodness for digital photos). I use my phone when I forget my camera...those don't always turn out the best, but sometimes you get lucky. Mo is wonderful when I stop and start shooting the same flower from 12 different angles - she just stops and sits down, patiently waiting for me to finish. That's pretty hard for a high-energy dog to do!

Here are my favorites from my last "Photo Shoot."
My photos from Louisville Park in Columbia, MO

I decided to use one or more of these as the basis for a piece of jewelry for the Berries and Leaves challenge, so I started playing in Picasa. Picasa is a free photo editing software. It works for almost every photo editing function I need. Plus, did I mention it's FREE?!

I love the milkweed pod and seed photos, I think I really managed to capture how they were blowing in the wind that day. But when I sized them down to create a pendant - down to a mere 1 to 1 1/2 inches tall - all of the detail was lost! So those photos are going to have to be used in a different way.

Next I decided to work with the Winterberry photo. It is a species of holly that grows wild in Missouri, all over our park.. It was the perfect green and red for a holiday pendant. I spiked up the color in Picasa and shrunk it down to fit in a round bezel I had in my stash.

My new color printer makes great color copies, but it's an Injet - which runs like crazy if I were to put resin or paper glaze over it. I did an internet search on how to set inkjet color, and the answer is - Krylon fixative spray (gotta love Google)! I got some today, and sprayed the photos I printed out. After they dried, I coated the paper with Alene's Paper Glaze. Last, I put the coated photo into the bezel and topped it with another coat of Paper Glaze.

Ta Da! Winterberry Pendant

I decided to keep the necklace simple and topped it with a cluster of olive green and red Swarovski crystals and an 18" brass chain.

Finished necklace with Swarovski crystal cluster
 
And so I have entered and completed my first Artisan Whimsy challenge. Tune in tomorrow for my "No Berries and Leaves" challenge piece, using the Tree photo above.

Saturday, October 13, 2012

Reveal: My Bead Table Blog Hop

Today is the reveal for Lisa Lodge's My Bead Table Blog Hop. Lisa sent us a (large) package of random coordinating beads, and along with things in our stash (stash only! no purchasing! that was the rules), we were to use as much as we could and Create.

Finally, the package arrived and inside I found a large bag of glass, seed beads, gemstone chips, some findings and large acrylic petals. The color scheme? Hot Pink. Bright Yellow. Black. White. The acrylic petals were big, over an inch tall. She also included 2 chicken beads - that's right, CHICKENS. What am I supposed to do with chickens? 

Bawk, bawk!

I have never worked with acrylic beads, and bright pink and yellow aren't colors that I usually work with. Ever. Fortunately, they came about 4 weeks earlier so I had time. I put them aside, and every time I passed by them, I thought about what to do.

When October rolled around, I knew it was time to get started actually using the beads. Still confused about what to do with these bright beads, finally something hit me. It's October, and I have a mix of pink beads. I decided to make jewelry to commemorate Breast Cancer Awareness.

The first thing I made was a Memory Wire bracelet. Whew, already the pressure was lighter - I used a lot of beads on this one! P.S.: this is the photo I pixellated for my preview post earlier this week. I actually like this bracelet and the color combo! It turns out all I needed to do was just begin.
First design, Memory Wire bracelet

Then I started on a necklace. I wanted a long necklace with a dangling pendant. There was a large white Howlite bead that was perfect as the foundation for the pendant. I used a variety of beads to make the dangles of various lengths. To continue with the Breast Cancer Awareness theme, I made a beaded pink ribbon out of seed beads and 28 ga. wire. I have some interesting crinkle stringing wire from Beadalon that I used for the lower beaded part. To show off the wire, I used crimp beads to space the beads. The remainder of the necklace is silver tone chain, and I finished it off with an "S" clasp that was part of the bead mix. It is very long, hanging well past the bust line. Perhaps that's why I had a really hard time getting a photo of this necklace. I am still not happy with the final photos, and I may try again this weekend depending on the lighting.


Time to make some earrings. I used the leftover chain from the necklace to make a quick pair of pink and yellow drop earrings with the small rhinestone beads.
Drop earrings in pink and yellow
I used 2 of the peach acrylic petals for a second pair of earrings. At first, I tried to use an eyepin through the top hole with another loop lower on the pin. I bent the middle to match the curve of the bead. It didn't hang well AT ALL! It looked terrible. After about 3 times, I tried a jumpring through the top, and I attached the eyepin to that. That worked exactly like I wanted. I love the look of these earrings especially with the heart charm, but they clack a little when you wear them.

Peach acrylic petal and crystal drop earrings
 
This second necklace is my favorite. The pink and brown button above the acrylic petal and the black and white leaf button are part of a closeout set of wooden buttons that I got on Etsy. Along with a caramel colored crystal rondelle and various leaf beads in my stash, it works for me. I wish I could get the petal to quit spinning around. I am going to play with the jump rings some more this weekend.


I had one more project planned, but I just ran out of time. It is the last hot pink acrylic petal filled with resin and a Pink Ribbon oval with a few pink glitter hearts sprinkled in. I intend to finish it with a simple chain and a pink ribbon accent above the petal pendant.


These was one casualty - a broken glass heart...I broke it trying to tighten up the loop I made at the top. It split right in half! I wasn't happy either, I really wanted to use it. I guess I don't know my own strength.
My broken heart

All in all, I am happy with how everything turned out for this Blog Hop. I like the designs I came up with, I made 4 1/2 pieces of jewelry and I used a lot more beads than I ever thought I would when the package arrived that's for sure.

But I still don't know what I'm going to do with the chicken beads. If you know a chicken lover, let me know - I'll send you some beads.

Please be sure and visit all the Blog Hop participants to read their story and see their designs!

Host: Lisa Lodge, Pine Ridge Treasures
Molly Alexander, Beautifully Broken Me
Audrey Belanger, Dreams of an Absolution
Ginger Bishop, lilmummy likes...
Tanya Boden, Fusion Muse
Lisa Boucher, Lisa’s Clay Happenings
Michelle Buettner, Mishel Designs
Eleanor Burian-Mohr, The Charmed Life
Mikala Coates, Maybe Just Perhaps
Marlene Cupo, Amazing Designs
Kathleen Douglas, Washoe Kat's
Mary Anne Klinglesmith Flesch, Handcrafted Serenity  *you are here
Therese Frank, Therese's Treasures
Mary Govaars, MLH Jewelry Designs
Tanya Goodwin, A Work in Progress
Mary Hicks, Falling Into the Sky
Tina Holden, Polymer Clay Bytes!
Shelly Joyce, Au jour le jour
Carolyn Lawson, Carolyn's Creations
Kathy Lindemer, Bay Moon Design
Susan Lloyd, Designs by Susan
Cynthia Machata, Antiquity Travelers
Kashmira Patel, Sadafule .. always in bloom!
Inge von Roos, Inge's Blog
Kristen Stevens, My Bead Journey
Sonya Stille, Dreamin' of Beads
Christine Stonefield, Sweet Girl Design
Toltec Jewels, Jewel School Friends
Norma Turvey, Moonlit Fantaseas
Sandra Wollberg, City of Brass Stories